[Spring] 예제로 배워보는 IoC/DI & Spring Bean Life Cycle
- 20 mins실습코드 {github}
Description:
Spring Framework을 구성하는 큰 축인 IoC/DI의 개념에 대해 알아보자. 그리고 Spring Framework의 Bean이란 무엇이고, 이 Bean의 생명주기란 무엇인지 알아보자.
INDEX
1. Java Bean vs Spring Bean
Java Bean
Java를 공부하다 Java Bean이라는 단어를 종종 보았을 것이다.
Java Bean 은 데이터를 표현하는 것을 목적으로 하는 자바 클래스이다. 특별한 것은 없고 Java Bean 규약 에 맞춰서 만든 클래스를 뜻한다.
<Java Bean 규약>
1. 기본생성자가 존재해야한다.
2. 모든 멤버변수의 접근제어자는 private이다.
3. 멤버변수마다 getter/setter가 존재해야한다. (속성이 boolean일 경우 is를 붙힘)
4. 외부에서 멤버변수에 접근하기 위해서는 메소드로만 접근할 수 있다.
5. Serializable(직렬화)가 가능해야한다.
직렬화
직렬화 란 시스템 내부에서 사용하는 객체 혹은 데이터를 외부의 시스템에서도 사용할 수 있도록 변환시키는 것을 말한다. 자바에서는 JVM의 Heap 영역에 상주한 객체를 byte형태로 변환시키거나(직렬화), byte 형태를 다시 자바 객체로 변환하는 것(역직렬화)을 말한다.
CSV, JSON format으로 자바 객체를 변경시키는 것도 직렬화하는 것이라고 볼 수 있다.
Serializable interface를 implements한 클래스는 직렬화 할 수 있다.
Java Bean 규약 예시
- Person
import java.io.Serializable;

// 직렬화가 가능하도록 Serializable 인터페이스를 구현
public class Person implements Serializable {
    // 모든 멤버변수의 접근자는 private
    private String name;
    private int age;
    private String address;

    // 기본생성자가 있어야한다.
    public Person() {
    }

    // 기본생성자가 있다면 매개변수가 있는 생성자가 있어도 무방함
    public Person(String name, int age, String address) {
        this.name = name;
        this.age = age;
        this.address = address;
    }

    // 각 멤버변수에 접근할 수 있는 getter/setter가 있어야한다.
    public String getName() {
        return name;
    }

    public void setName(String name) {
        this.name = name;
    }

    public int getAge() {
        return age;
    }

    public void setAge(int age) {
        this.age = age;
    }

    public String getAddress() {
        return address;
    }

    public void setAddress(String address) {
        this.address = address;
    }
}
Spring은 뷰 영역(JSP, 혹은 다른 템플릿 엔진)에 데이터를 출력하고 싶을 때 Java Bean 규약에 맞춰 만들어진 객체를 사용하고, 객체들을 외부 저장소에 저장하고 전송할 때 사용한다.
Spring Bean
Spring Bean은 Spring Framework의 Container에 의해 등록, 생성, 조회, 관계설정이 되는 객체이다. 일반 Java Object와 동일하지만 IoC 방식으로 관리되는 오브젝트를 뜻한다.
Spring Bean은 Java Bean과는 달리 별다른 생성 규칙은 없다.
어려운 용어가 갑자기 늘어났다. 아래의 IoC/DI와 Container에 대해 공부하고
Spring Bean에 대해 알아보자
2. IoC/DI
Spring 삼각형
스프링의 기반이 되는 설계 개념을 표현한 것
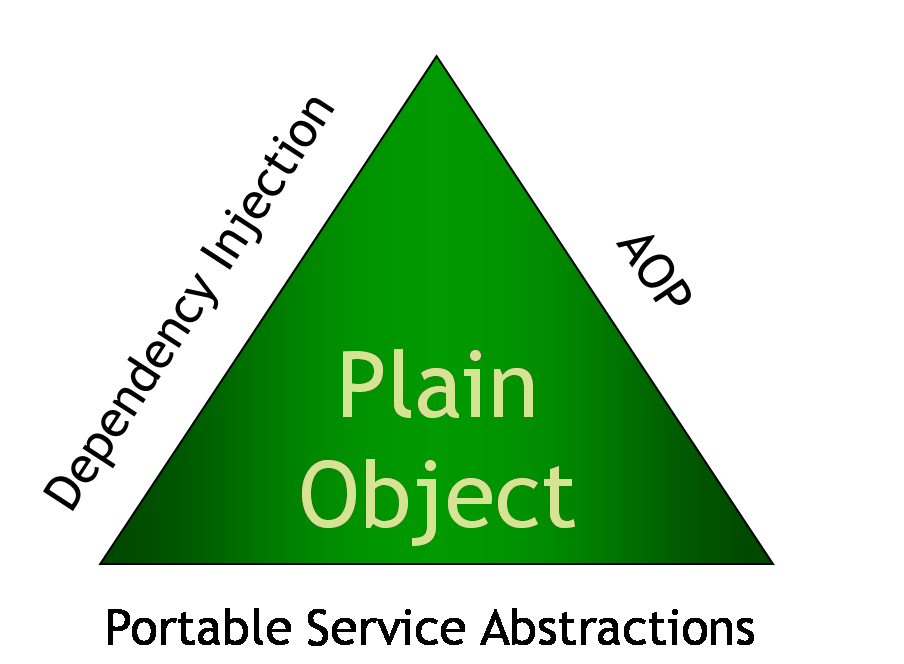
“스프링이란 IoC와 AOP를 지원하는 경량의 컨테이너 프레임워크이다.”
너무나 방대한 내용이기에 Container를 설명하기 위해 필요한 IoC/DI 에 대해서만 설명하겠다.
IoC / DI
Inversion Of Control / Dependency Injection
IoC와 DI를 한글로 번역하면 제어 역전의 원칙과 의존성 주입이다. 더욱 쉽게 말하면 대신해준다(IoC)와 대신넣어준다(DI) 는 뜻이다. 이 때 Spring에서 대신해주는 것은 미리 찜해놓은 객체를 생성하고 관계를 설정시켜주고 소멸시키는 것이다.
일반적인 의존관계
보통 프로그램의 실행흐름에 따른다면, 무언가 필요한 쪽에서 필요한 객체를 만들고, 만들어진 객체의 메소드를 직접 호출해서 사용한다. 여기서 각 객체는 프로그램의 흐름에 능동적으로 참여하게된다. 이 때 모든 작업은 사용하는 쪽에서 제어한다.
- SoccerPlayer
class SoccerPlayer {
  private NikeSoccerBall nikeBall;

  public SoccerPlayer() {
    this.nikeBall = new NikeSoccerBall();
  }

  public void playSoccer() {
    System.out.println("축구선수가 공을 찼다!");
    this.nikeBall.touchBall();
  }
}
- AdidasSoccerBall, NikeSoccerBall
class AdidasSoccerBall {
  public void touchBall() {
    System.out.println("아디다스 축구공이 굴러간다!");
  }
}

class NikeSoccerBall {
  public void touchBall() {
    System.out.println("나이키 축구공이 굴러간다!");
  }
}
- Driver
public class Driver {
  public static void main(String[] args) {
    SoccerPlayer sp = new SoccerPlayer();
    sp.playSoccer();
  }
}
상단의 코드에서 SoccerPlayer가 playSoccer()를 실행하기 위해서는 NikeSoccerBall이 필요하고, SoccerPlayer 자신이 직접 NikeSoccerBall을 만들어서 사용하고 있다. 이 상태를 SoccerPlayer가 NikeSoccerBall에 의존하고 있다고 표현할 수 있다.
만약 축구선수가 다른 축구공을 사용해야 할 경우. SoccerPlayer의 많은 부분을 수정해야 할 것이다.
그렇다면 이런 의존관계를 역전시켜보자.
- SoccerBall
interface SoccerBall {
  void touchBall();
}

class AdidasSoccerBall implements SoccerBall {
  public void touchBall() {
    System.out.println("아디다스 축구공이 굴러간다!");
  }
}

class NikeSoccerBall implements SoccerBall {
  public void touchBall() {
    System.out.println("나이키 축구공이 굴러간다!");
  }
}
- SoccerPlayer
class SoccerPlayer {
  private SoccerBall ball;

  public void setSoccerBall(SoccerBall ball) {
    this.ball = ball;
  }

  public void playSoccer() {
    System.out.println("축구선수가 공을 찼다!");
    this.ball.touchBall();
  }
}
- Driver
public class Driver {
  public static void main(String[] args) {
    SoccerPlayer sp = new SoccerPlayer();

    // NikeSoccerBall
    SoccerBall nikeBall = new NikeSoccerBall();
    sp.setSoccerBall(nikeBall);
    sp.playSoccer();

    // AdidasSoccerBall
    SoccerBall adidasBall = new AdidasSoccerBall();
    sp.setSoccerBall(adidasBall);
    sp.playSoccer();
  }
}
이번에는 SoccerBall을 인터페이스로 만들었고 SoccerBall을 implements하는 각각의 축구공 클래스를 만들었다. 축구선수는 축구공을 자신이 만들어서 사용하는 것이 아니라. 외부에서 만들어 진 것을 받아서 사용하고 있다. 또한 타입을 인터페이스로 바꾸었기에 어떤 공이든 코드에 변경없이 사용할 수 있다.
축구선수가 축구공에 의존하고 있던 관계가 뒤집어진 것이다. 이 것을 DIP(의존 역전 원칙) 이라한다.
하지만 아직도 코드를 실행하는 부분에서 SoccerBall의 종류를 선택하여 직접 생성하고 SoccerPlayer에게 set해주는 작업을 해야한다.
그럼 IoC/DI 개념을 적용하여 어떻게 될까?
여기서부턴 Spring 프로그램이다.
- SoccerBall
interface SoccerBall {
  String touchBall();
}

@Component("adidasBall") // adidasBall이란 이름을 가진 Bean으로 등록
public class AdidasSoccerBall implements SoccerBall {
  public String touchBall() {
      return "아디다스 축구공이 굴러간다!";
  }
}

@Component("nikeBall") // nikeBall이란 이름을 가진 Bean으로 등록
public class NikeSoccerBall implements SoccerBall {
  public String touchBall() {
      return "나이키 축구공이 굴러간다!";
  }
}
- SoccerPlayer
@Component // 의존성을 주입받는 객체도 Bean으로 등록되어야 한다.
public class SoccerPlayer {
    @Autowired
    @Qualifier("nikeBall")
    private SoccerBall ball;

    public String playSoccer() {
        return "축구선수가 공을 찼다! \n" + this.ball.touchBall();
    }
}
- SoccerController
@RestController
public class SoccerController {
    @Autowired // SoccerPlayer라는 타입을 가진 Bean을 찾아서 주입시킴
    private SoccerPlayer soccerPlayer;

    @RequestMapping("/soccer")
    public String soccerDriver() {
        return soccerPlayer.playSoccer();
    }
}
Spring에서 쓰이는 것을 보여주기위해 여러 코드가 늘었지만 실제 실행되는 실행부의 코드만 보도록하자
방금 전까지는 main()에서 축구선수가 축구공을 set받아 사용하였다. 하지만 이번에는 어떤 곳에서도 SoccerBall 객체를 생성하지 않는다.
해당 코드에선 보이지 않겠지만 @Component라는 어노테이션이 붙은 클래스들은 Spring의 Container가 알아서 Spring Bean 객체로 등록하고 생성한다. 이렇게 생성된 객체는 @Autowired라는 어노테이션이 붙은 변수의 타입(타입이 같은 Bean 여러개 있다면 이름을 본다.)을 보고 해당 변수에 객체를 주입하게 된다.
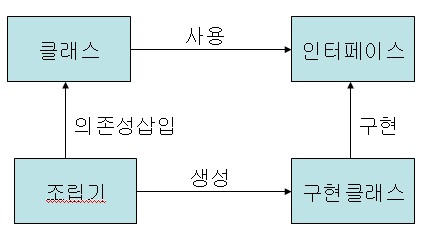
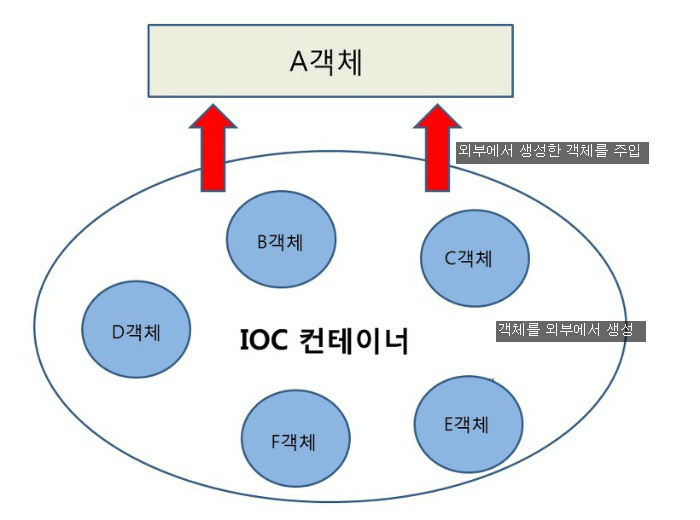
스프링의 Container가 대신 객체를 생성해주고 알아서 객체를 주입해준다. 이렇게 생성된 객체는 자신이 어디에 쓰일지 알지 못한다. 이것이 제어 역전의 원칙 이며 스프링은 DI(의존성 주입) 라는 개념으로 구현하고 있다.
3. Container
앞서 Spring Bean이 스프링 컨테이너에 의해 관리되는 객체란 것을 배웠다. 그럼 이런 역할을 해주는 Container는 무엇인가?

여러가지 이름으로 불린다. Spring Container, DI Container, IoC Container, Bean Container 등.
스프링의 컨테이너는 프로그래머가 작성한 코드의 처리과정을 위임받아 독립적으로 처리하는 존재이다. 컨테이너의 사전적 의미는 무언가를 담는 용기, 즉 그릇을 의미한다. 이를 통해 접급하자면 컨테이너는 객체관리를 주로 수행하는 그릇정도로 이해할 수 있다.
사용하는 이유
우리는 객체를 사용하기 위해서 new 생성자를 이용하거나 getter/setter 기능을 써야만 했다. 한 어플리케이션에는 이러한 객체가 무수히 많이 존재하고 서로 참조하고 있을 것이다. 그 정도가 심할 수록 의존성이 높다고 표현한다. 낮은 결합도와 높은 캡슐화로 대변되는 OOP에서 높은 의존성은 매우 지양된다.
애플리케이션 유지보수 경험이 많지 않은 시점에 DI를 접할 경우 필요성을 느끼기 쉽지 않다. 경험이 많지 않은 상태에서 필요성을 느낄 수 있는 좋은 방법은 테스트 코드를 구현할 때이다.
의존성 제어, 즉 객체 간의 의존성을 낮추기 위해 바로 Spring 컨테이너가 사용된다.
- 코드가 깔끔해지고 사용하기 쉽다.
- 재사용하기 좋다.
- 테스트하기 쉽다.
종류

BeanFactory
Bean 객체를 생성하고 관리하는 인터페이스이다. 디자인패턴의 일종인 팩토리 패턴을 구현한 것이다. BeanFactory 컨테이너는 구동될 때 Bean 객체를 생성하는 것이 아니라. 클라이언트의 요청이 있을 때(getBean()) 객체를 생성한다.[lazy init]
ApplicationContext
BeanFactory를 상속받은 interface이다. 부가적인 기능이 많기 때문에 더 많이 사용한다. ApplicationContext 컨테이너는 구동되는 시점에 등록된 Bean 객체들을 스캔하여 객체화한다.[eager init]
[추가기능]
- 국제화 지원 텍스트 메시지 관리
- 이미지 파일 로드
- Listener로 등록된 Bean에게 이벤트 발생 통보
Configuration MetaData
xml 설정파일을 통한 등록에 관련된 문제점을 알고싶으면 여기로
Container에 Bean의 메타정보를 등록하기 위한 설정방법 두 가지
- BeanA
class BeanA {

}
- BeanB
class BeanB {
  private BeanA beanA;

  public void setBeanA(BeanA beanA) {
    this.beanA = beanA;
  }
}
1. xml 설정파일을 통한 등록
한번에 의존관계를 볼 수 있다는 장점도 있지만 너무 복잡하고, 알아보기 힘들어서 요즘은 안 쓴다.
- web.xml
<?xml version="1.0" encoding="UTF-8"?>
<beans>
    <bean id="beanA" class="test.bean.BeanA"/>
    <bean id="beanB" class="test.bean.BeanB">
        <property name="beanA" ref="beanA"></property>
    </bean>
</beans>
2. Java Config(.java파일과 어노테이션)을 이용한 등록
요즘 가장 많이 사용하는 방법. 직관적이고 가독성이 좋다.
- WebConfig
@Configuration
public class WebConfig {
  @Bean(name = "beanA")
  public BeanA beanA {
    return new BeanA();
  }

  @Bean(name = "beanB")
  public BeanB beanB(BeanA beanA) {
    BeanB beanB = new BeanB();
    beanB.setBeanA(beanA);
    return beanB;
  }
}
Spring-Boot는 어노테이션을 통해 Bean을 설정하고 주입받는 것을 표준으로 삼는다.
- Container에 Spring Bean으로 등록시켜주는
Annotation
ex) @Bean, @Component, @Controller, @Service, @Repository

- @Bean은 개발자가 컨트롤 할 수 없는 외부 라이브러리 Bean으로 등록하고 싶은 경우
(메소드로 return 되는 객체를 Bean으로 등록)

- @Component는 개발자가 직접 컨트롤할 수 있는 클래스(직접 만든)를 Bean으로 등록하고 싶은 경우
(선언된 Class를 Bean으로 등록)

- @Controller, @Service, @Repository 등 은 @Component를 비즈니스 레이어에 따라 명칭을 달리 지정해준 것
- Container에 있는 Spring Bean을 찾아 주입시켜주는
Annotation
- @Recource : 이름으로 참조할 Bean을 검색하여 주입한다. (JAVA 표준)
- @Autowired : 타입으로 참조할 Bean을 찾아 주입한다. (SPRING 표준)
4. Spring Bean LifeCycle
Spring Bean의 생명주기
Spring-Boot 기준 어노테이션 방식
1. Spring Application이 시작되고 Bean 설정파일 초기화
public BeanA() {} // 기본생성자
config.java(어노테이션이 붙은 모든 것을 찾음) 혹은 web.xml을 이용하여
Bean으로 등록할 대상을 찾아 기본 생성자를 호출하여 Bean 등록
2. Bean으로 등록할 객체 초기화
// @Component를 사용할 경우
@PostConstruct
public void init() {
  System.out.println("init");
}

// @Bean을 사용할 경우
@Bean(initMethod = "init")
public BeanA beanA() {
  return new BeanA();
}
Bean의 의존관계를 확인하여(@Autowired, @Resource) 다른 Bean을 주입해주고, Bean 설정파일에 있는 init-method를 호출한다.
3. Bean 준비상태
모든 Bean의 초기화가 끝나고 사용 가능한 상태
4. Bean 소멸상태
// @Component를 사용할 경우
@PreDestroy
public void destroy() {
  System.out.println("destroy");
}

// @Bean을 사용할 경우
@Bean(destroyMethod = "destroy")
public BeanA beanA() {
  return new BeanA();
}
spring 프로젝트가 종료될 때 Bean 설정파일의 destroy-method가 호출된다. (초기화 순서의 역순으로 실행)
의존관계에 따른 생명주기의 변화
의존관계가 없는 경우
- BeanA
package spring.springbeanlifecycle.bean;

public class BeanA {
    public BeanA() {
        System.out.println("BeanA : 생성자");
    }

    public void init() {
        System.out.println("BeanA : init");
    }

    public void destroy() {
        System.out.println("BeanA : destroy");
    }
}
- BeanB
package spring.springbeanlifecycle.bean;

public class BeanB {
    public BeanB() {
        System.out.println("BeanB : 생성자");
    }

    public void init() {
        System.out.println("BeanB : init");
    }

    public void destroy() {
        System.out.println("BeanB : destroy");
    }
}
- WebConfig
package spring.springbeanlifecycle;

import org.springframework.context.annotation.Bean;
import org.springframework.context.annotation.Configuration;
import org.springframework.web.servlet.config.annotation.WebMvcConfigurerAdapter;
import spring.springbeanlifecycle.bean.BeanA;
import spring.springbeanlifecycle.bean.BeanB;

@Configuration // web.xml과 같은 역할
public class WebConfig extends WebMvcConfigurerAdapter {
    @Bean(name = "beanA", initMethod = "init", destroyMethod = "destroy")
    public BeanA getBeanA() {
        return new BeanA();
    }

    @Bean(name = "beanB", initMethod = "init", destroyMethod = "destroy")
    public BeanB getBeanB() {
        return new BeanB();
    }
}
- ComponentA
package spring.springbeanlifecycle.component;

import org.springframework.stereotype.Component;

import javax.annotation.PostConstruct;
import javax.annotation.PreDestroy;

@Component
public class ComponentA {
    public ComponentA() {
        System.out.println("ComponentA : 생성자");
    }

    @PostConstruct
    public void init() {
        System.out.println("ComponentA : init");
    }

    @PreDestroy
    public void destroy() {
        System.out.println("ComponentA : destroy");
    }
}
- ComponentB
package spring.springbeanlifecycle.component;

import org.springframework.stereotype.Component;

import javax.annotation.PostConstruct;
import javax.annotation.PreDestroy;

@Component
public class ComponentB {
    public ComponentB() {
        System.out.println("ComponentB : 생성자");
    }

    @PostConstruct
    public void init() {
        System.out.println("ComponentB : init");
    }

    @PreDestroy
    public void destroy() {
        System.out.println("ComponentB : destroy");
    }
}
- DiController
package spring.springbeanlifecycle.controller;

import org.springframework.web.bind.annotation.RequestMapping;
import org.springframework.web.bind.annotation.RestController;

import javax.annotation.PostConstruct;
import javax.annotation.PreDestroy;

@RestController
public class DiController {

    public DiController() {
        System.out.println("DiController : 생성자");
    }

    @PostConstruct
    public void init() {
        System.out.println("DiController : init");
    }

    @RequestMapping("/")
    public String index() {
        return "hello world";
    }

    @PreDestroy
    public void destroy() {
        System.out.println("DiController : destroy");
    }
}
Spring Project 실행
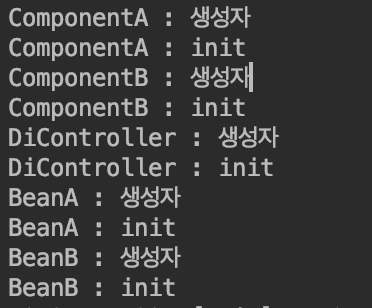
각 Bean 객체들이 초기화 될 때. 생성자, init() 순으로 진행된다.
Spring Project 종료
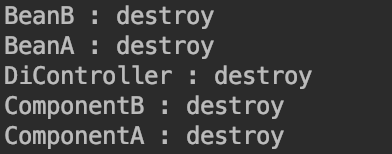
각 Bean 객체들이 초기화 된 순서의 역순으로 destroy()된다.
의존관계가 있는 경우
상단의 DiController에 다른 Bean들과 의존관계를 설정해 보았다.
- DiController
package spring.springbeanlifecycle.controller;

import org.springframework.beans.factory.annotation.Autowired;
import org.springframework.web.bind.annotation.RequestMapping;
import org.springframework.web.bind.annotation.RestController;
import spring.springbeanlifecycle.bean.BeanA;
import spring.springbeanlifecycle.bean.BeanB;
import spring.springbeanlifecycle.component.ComponentA;
import spring.springbeanlifecycle.component.ComponentB;

import javax.annotation.PostConstruct;
import javax.annotation.PreDestroy;

@RestController
public class DiController {

    @Autowired
    private BeanA beanA;

    @Autowired
    private BeanB beanB;

    @Autowired
    private ComponentA componentA;

    @Autowired
    private ComponentB componentB;

    public DiController() {
        System.out.println("DiController : 생성자");
    }

    @PostConstruct
    public void init() {
        System.out.println("DiController : init");
    }

    @RequestMapping("/")
    public String index() {
        return "hello world";
    }

    @PreDestroy
    public void destroy() {
        System.out.println("DiController : destroy");
    }
}
Spring Project 실행
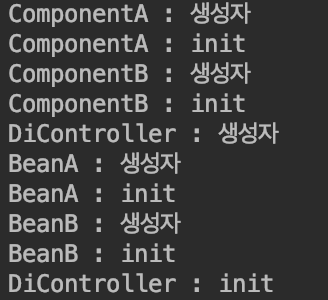
각 Bean 객체들이 순서대로 생성, 초기화 되다가, 의존하고 있는 Bean을 가진 Bean이 초기화 될 때, 의존하는 Bean이 없는 경우 먼저 해당 Bean을 생성,초기화 해준다.
Spring Project 종료
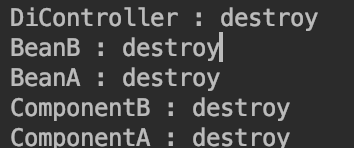
각 Bean 객체들이 초기화 된 순서의 역순으로 destroy()된다.
Spring Bean의 Scope
자세한 내용은 여기로
Bean은 기본적으로 등록된 Container에 1개의 인스턴스만 존재한다. 이 것을 Singleton Scope라고 한다. 이 것 말고도 다양한 Scope를 지정해서 사용할 수 있다.
- singleton : 기본(Default) 싱글톤 스코프. 하나의 Bean 정의에 대해서 Container 내에 단 하나의 객체만 존재한다.
- prototype : 어플리케이션에서 요청시 (getBean()) 마다 스프링이 새 인스턴스를 생성
- request : HTTP 요청별로 인스턴스화 되며 요청이 끝나면 소멸 (spring mvc webapplication 용도)
- session : HTTP 세션별로 인스턴스화되며 세션이 끝나며 소멸 (spring mvc webapplication 용도)
- global session : 포틀릿(portlet) 기반의 웹 어플리케이션 용도. 전역 세션 스코프의 빈은 같은 스프링 MVC를 사용한 포탈 어플리케이션 내의 모든 포틀릿 컨텍스트 사이에서 공유할 수 있다
- application : 새 스레드에서 요청하면 새로운 bean 인스턴스를 생성, 같은 스레드에 대해서는 항상 같은 bean 인스턴스가 반환된다.
사용법
Annotation 방식
@Bean
@Scope("prototype") // Bean 등록 어노테이션 밑에 @Scope 어노테이션을 추가해준다.
